How do you get started with Landscape Photography?
You can start landscape photography without even buying a camera. In fact, in the beginning, you can take landscape photographs through your mobile phone camera. We all know that photography can be a really expensive hobby to get into, but it doesn’t have to be necessary. So why don’t you start taking landscape photography just using the camera you have, maybe just the one on the mobile phone if you don’t have any other?
The first thing you need to understand in landscape photography is the light
In every genre of photography, and especially in landscape photography, you need to understand and know the light. In fact, the word photography literally means “writing with light”. Photography is exactly the process of recording an image on a light-sensitive film or sensor. So the main thing about landscape photography is not the camera, it is the light.
If you don’t understand how light works, you can even go out with the most expensive camera gear, but the result will probably be not so compelling and you won’t make good landscape photographs. If you just buy an expensive camera and start taking random landscape photos without any knowledge about the light you are on the highway to failing landscape photography. In this way, you will probably end up abandoning your new hobby of photography really soon.
Welcome to the amazing new world of light
All the different kinds of light can be confounding at the beginning. If you have blue light you are in the blue hour, you have golden light you are in the golden hour, you have flat light during an overcast day, and you can also find backlight, so there is a lot of different light out there.
Understanding the light helps you determine when to go out. To capture a landscape during the blue hour you have to go out before the sun rises or after the sun sets. If you want a flat light for your landscape you know you have to go to a certain location during overcast days.
Understanding the light is the very urgently important first thing. This is the very foundation for landscape photography. And of any genre of photography of course.
You probably know that you shouldn’t take photographs in the middle of the day. The sun is bright and the light is difficult to manage, you get harsh light and deep shadow. The light in the middle day isn’t flattering for any subject, not only for portraits but also for landscape photography. Mornings and evenings will offer a soft, gentle light and the sun low over the horizon casts soft shadows. Another amazing thing about mornings and evenings time is that you have a lot of soft shadows as the light is coming in from an angle.
Different types of natural light you can find in Landscape Photography
To start as a beginner you should take photographs during sunrise and sunset so the light will be easier for you to be captured and will be more flattering and pleasant to your landscape. But as you get more experienced you will be able to use also other different light conditions to take beautiful landscape photographs.
The golden hour. Take advantage of side lightning
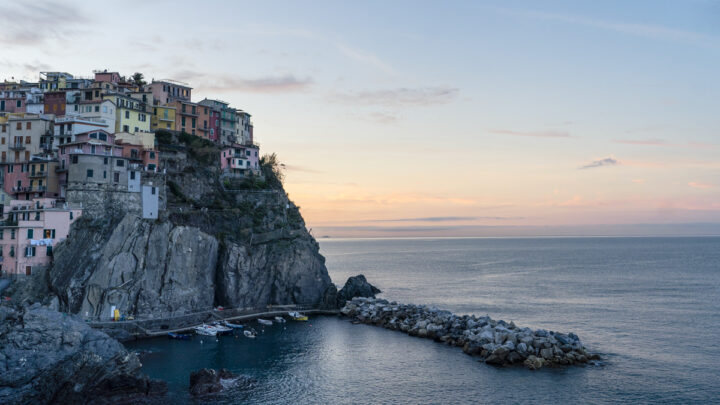
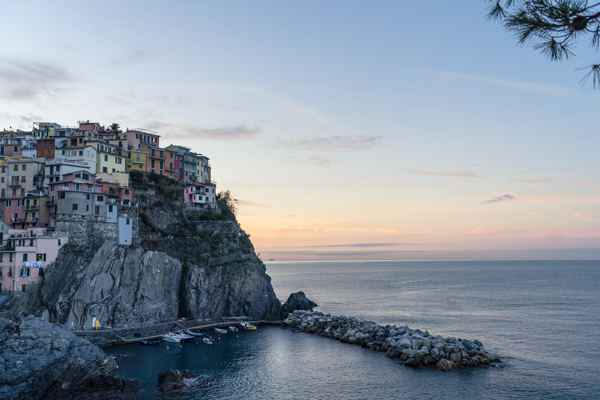
To take photographs in nature during the golden hour is the winning choice for landscape photography. In fact, the side light during sunrise reveals textures, is rich in interesting shadow, paints contrast, and emphasizes colors of nature. The name golden light refers to the light going from red to yellow through all shades of orange. When is the golden hour? Up to one hour after sunrise and up to one hour before sunset.
The golden hour light, as I just wrote above, produces long shadows. For this reason, if you go out shooting at this time of the day, you can use this light to produce shapes and textures through the shadow in your landscape photographs. Try to capture nature in front of your lens from different perspectives to achieve the better result possible. In this way, you will learn about light really fast.
Are sunrise and sunset the same? No, really they aren’t. The main difference is the light direction, so you should choose which one is better depending on where you are. Another difference is the quality of light. In fact, the light tends to be clearer during sunrise than during sunset. At sunset, the light is usually more reddish than at sunrise.
The backlighting
With backlighting your photograph will have more contrast and the sky will be really bright because of the sun. As the sun is in front of your lens sun glares will appear in the photograph. This kind of light enhances contrast and saturation and lightens the object’s edges. To fix the problem of high contrast you can underexpose, use the bracketing of the camera or use graduated filters.
Personally, I prefer the first choice. As modern digital cameras have a high dynamic range you can easily expose the sky and then recover the shadow through editing.
About the problem of the lens flare, you can try to clean the lens before shooting backlighting. Every dust particle will seem enormous when lit by the sun. Another try can be made by changing the angle to reduce the glare you capture in the photograph.
The blue hour
When the landscape is saturated with blueish light and the sky overhead takes a deep blue color you are in the blue hour. It is that time of the day when there is twilight and the sun has just set or is about to rise. What we call blue hour, in reality only last about 20-30 minutes. For this reason, is a good idea to be prepared when you are taking photographs on the field, probably can be a good idea to use the Aperture Priority Mode to work faster controlling the desired depth of field you need for your landscape.
In fact, the blue hour is the 20-30 minutes just after sunset and just before sunrise. The exact timing of the blue hour changes from location to location, also depending on the time of the year and air quality.
Anyway, we can say that the blue hour is when the sun is under the horizon, the sky is deep blue and the landscape is saturated with blueish light. And this is a great moment to take amazing landscape photographs. You won’t be disappointed by the final result of taking photos in the blue hour.
The top lighting
About front lighting, the general rule is: don’t use front lighting. When is the middle of the day try to stay away from landscape photography (and from portrait photography as well). Try to take photographs only around sunrise and sunset to make the best landscape images. This is the general rule. And the great thing about rules there is the fact that, as you get more experienced, you can try to break them.
Front lighting is amazing for taking pictures of beaches and water because water won’t have any shadow, the top lighting will also fill any shadow of the sand and the sky will look perfectly blue.
The front lighting
Front lighting is just easy to use to make landscape photography. The image may seem to be bright and with nice colors. But the landscape photographs taken using front lighting aren’t interesting, they are just flat, with no depth, and not pleasing for the viewer. In fact, with front lighting, the light removes and fills all the shadows. For the exact opposite reason, the golden hour is so flattering to take landscape images.
The visualization
In my mind, I visualize how a particular… sight will appear on a print. If it excites me, there is a good chance it will make a good photograph. It is an intuitive sense, an ability that comes from a lot of practice
Ansel Adams
For Ansel Adam, the great landscape photographer, the transformation of a visual encounter with the world into a great photograph is the essence of photography. This is the reason why we go outside to make landscape photography. The photograph is nothing but the product of the vision of the photographer, the way he perceived reality, and the way he felt in that moment. A photograph is the final result of a sensitive and receptive mind and a well-executed sequence of actions in the field and during the editing process. If interested you may also read this other article about The Imagination in photography.
Visualization is a conscious process of visualizing the final photograph in your mind before you even take the photo. It is about being aware of the subject, about the light and the potential of the scenario you see with your own eyes.
Photography and reality
A photograph can’t replicate the range of brightnesses of most subjects, for this reason, it is just an interpretation of the original subject values. The photographer can choose between a nearly literal representation of the subject and a more freely interpretation with more subjective departures from reality. Much of the creativity of photography relies on this infinite range of choices that the photographer has about how he wants to make his/her interpretation of reality.
The photo that you took with your camera is the imagination you want to create with reality.
Scott Lorenzo
All the photographs are accurate, none of them is truth.
Richard Avedon
I have a vision of life, and I try to find equivalents for it in the form of photographs.
Alfred Stieglitz
So through your camera settings, you are trying to take a photograph that is more or less the equivalent of what you saw and felt according to your vision of the world. You have a lot of freedom to alter values through controls of exposure, the use of filters, and finally the editing. The main purpose of visualization is to anticipate this creative freedom starting from the very first approach to the subject.
Visualization is like asking your eyes to be more perceptive in terms of significance, substance, shape, texture, and the relationships of tonal value.
In photography there is a reality so subtle that it becomes more real than reality.
Alfred Stieglitz
The gear
First of all: the camera
For your gear, there is no limit on how much you can spend on it. But to spend a lot of money on a camera at the beginning is never a good idea. You can buy a DSLR or a mirrorless, doesn’t really matter which one. Even the resolution doesn’t matter, any camera you buy today will be in the 20-megapixel range and above, and will be more than enough. The camera doesn’t have to be a full-frame camera. Can be a crop sensor camera or a micro 4/3, can also be a full frame but it is not necessary.
The lenses
I think for a beginner a good wide angle fixed lens or a wide-angle zoom lens is a good choice. If you have the budget also a good telephoto lens can be really useful. Anyway just with a wide angle lens you can start making landscape photography without any problem. If you want to start with a wide angle zoom lens the 16-35mm will be perfect. A good telephoto zoom lens can be a 70-200.
Having a wide angle zoom lens and a telephoto zoom lens when you are in front of your landscape you have only two possible decisions to make: do you want to go wide, or do you want to go long? In this way, you don’t miss the shoot overthinking and you don’t lose time changing lenses all the time while the magic is happening in front of your lens. When you don’t have tons of different decisions to make you will get the better landscape photographs you can.
Don’t buy a lot of different lenses and gear until you don’t understand what you need.
The tripod
About the tripod we can say the same we said about cameras. Don’t spend a lot of money until you are not sure you are going to really like landscape photography. You can go through higher quality and more expensive tripod as you get more expert in landscape photography. You don’t know how long are you gonna stick with it at the very beginning of your landscape photography journey so why waste your money?
The camera bag
Something really important in landscape photography is the camera bag. To carry all your stuff you need a good one. You want to feel comfortable walking or hiking with your gear in the bag, you don’t want to be uncomfortable when you get to your location to take your landscape photos. You don’t want your back hurting because you are using an uncomfortable camera bag.
Polarized filter
It is great to remove glare from the water and any kind of reflection also helps to boost color (especially green).
L bracket
The L bracket helps you easily move your camera from landscape orientation to portrait orientation on your tripod without having to roll your bullhead, which is time-consuming. Moving the bullhead also makes your tripod unstable, so the L bracket is really helpful.
How to make landscape photographs while you are on location
While you are on location, looking at your landscape, you have to be prepared to capture your photograph in the best possible way. So you must know the gear and how to use the right camera settings. Before being on the location you should study how to change the aperture, the Iso, the shutter speed, understand the instagram, how does it works the exposure triangle, understand where to focus and how to focus, and understand composition (for example the very important rule of third), how to use the exposure bracketing just in case you need, how and when you should use long exposure.
You can study all these things you absolutely need to know before actually going on location, so you will be prepared for any situation. Whatever you learn at home you will later improve practicing on the field.
When you are on the field pay attention to the mechanics of the actual process of making landscape photography while you are on location. In this way, you will also understand where you should be more prepared, and what you need to study again to improve and achieve better results next time you go outside with your camera.
The editing process
In any kind of photography, there is the final step of post-processing, of course also in landscape photography. There is a lot to study about editing and you will need to spend some money on editing software. In fact, Photoshop, Lightroom, Capture One, and Luminar are not free. Anyway, you can find a lot of free information to learn about how to use this editing software. And this is great.